Hikers and backpackers across the globe have been dealing with blisters for decades. There’s nothing worse than that moment you realize you have a blister. You know that every step to take will become more and more painful.
By the end of the day, you can barely walk. Blisters can quickly turn a great trip into a pain-filled nightmare. There’s no reason why you should let blisters ruin your trip. Although you can get temporary blister relief on the trail, you’re much better off learning how to prevent hiking blisters in the first place.
With these tips, you should be able to cure and prevent blisters before they form.
How Do You Get Hiking Blisters?
Blisters are damaged skin caused by friction, heat and chemicals. In this post we will focus primarily on blisters caused by friction.
Most backpackers get blisters because of socks/shoes that don’t fit properly. Throughout the course of a day, the skin on your feet isrubbed raw as the socks and shoes rub against each other. This isn’t something that happens over 20 minutes. You have to be up on your feet for an extended period of time.
What Causes Blisters?
Every hiker’s had a blister at some point in their life. Blisters are by far the most common injury hikers have. Most blisters are caused by poor-fitting shoes/socks, lack of conditioning, and not properly caring for your feet.
- Heat: Excessive friction is normally caused by shoes that don’t fit properly. Your feet starts rubbing against the sides of your socks and it will quickly cause hot spots. The top layer of your skin is being literally worn away.
- Grit and Grime: Spend enough time on the trail and you’ll eventually get grit and grime in your shoes. Throughout the day, remove sand, dirt and gravel from the insides of your boots. Those little pieces of debris will cause serious hotspots over a long hike.
- Moisture: Moisture causes two main problems. Wet socks cause more friction, reduces the cushioning and increases the movement in your shoes. Moisture also softens up the skin(think about how pruney your feet look after a bath).
Blister Stages
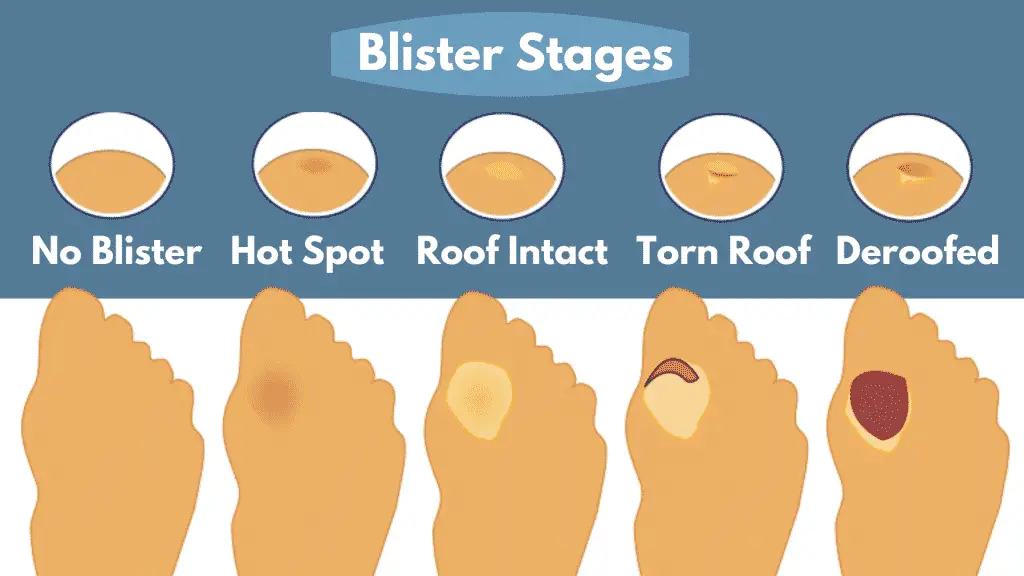
The way you treat your blister depends on the stage. There are 5 basic stages of blister progression and 3 different styles of blister. Each stage of blister needs to be treated differently.
- No Blister: Your foot feels perfectly normal. This is where you need to start using preventative measures. I highly recommend applying hikegoo to areas where you normally get blisters.
- Hot-Spot: You can feel slight pain from your foot rubbing inside your shoe. It feels physically hot to the touch, but you don’t have a complete blister. Take your shoes off for a bit and apply both hikegoo and moleskin to the area to prevent further damage.
- Roof Intact: A small blister starts to form, but the roof is fully intact. At this point your best bet is to rest, air out your feet and pop the blister using a sterilized needle. Apply neosporin/antiseptic and once again apply moleskin to the damaged area.
- Torn Roof: If the roof if your blister is torn off you need to take surgical scissors and cutoff the excess skin. Cutting off the skin stops the blister from spreading. Use Neosporin and moleskin
- Deroofed: At this stage you’re probably in serious pain. The blister is rubbed raw and likely hard to the touch. You need to take a serious break and air out your feet for 20-30 minutes. After that apply antiseptic/Neosporin and moleskin.
Lube Up Your Feet
Products like Hikegoo are designed to protect your feet against blisters. There are a few other similar products on the market, but I’ve had the most luck with Hikegoo.
You just apply it to your feet in the morning and you’re good to go all day long. I’ve even used it a couple of times while running marathons and didn’t have any issues.
Hiking Blister Prevention
The key to keeping your feet happy is preventing blisters before they form. Luckily, with a few basic tricks you should be able to completely prevent blisters.
- Wear properly fitted shoes
- Use soft insoles
- Wear thick hiking socks
- Air out your feet to dry them off
- Stop to remove dirt and debris
- Take regular rest breaks.
- Apply Moleskin and Hikegoo when necessary
1) Wear Shoes That Fit Right
Take the time needed to find shoes that actually fit your feet. Don’t go out and buy the cheapest hiking shoes you can find. Quality hiking boots and trail runners are worth their weight in gold.
When trying on shoes your feet should fit snug with just a little bit of wiggle room. Very few people know their actual shoe size. Do yourself a favor and measure both the width and length of your feet. Even if you think you know your shoe size check out shoe size charts to make sure you’re buying the right shoes.
I used to have a lot of trouble with blisters and cramping in my calves. After going to a podiatrist I found out that I needed double-wide shoes which allowed me to squeeze into size 12s when before I was wearing 13s.
He also let me know that I have high arches and I would benefit from special shoe inserts.
2) Break in Your Hiking Boots/Shoes
Breaking in your boots or shoes before heading out is huge. Stiff boots will rub your feet and quickly cause blisters that could have easily been prevented. Since it takes hours for blisters to form wearing them out shouldn’t be a problem.
I wouldn’t recommend heading out to the bars, but walking around the house shouldn’t be a problem. After wearing them for a couple of hours the materials should quickly soften making your shoes more comfortable.
If the shoes aren’t comfortable after a week or two you have a couple of options. You can either take them back to the store for an exchange or you can go purchase a shoe insert.
A few years ago I bought custom shoe inserts and those were amazing(though expensive). Nowadays I favor those Dr. Scholl’s Custom Fit Orthotics you see at Walmart/CVS. They aren’t better than the custom-molded inserts, but they’re significantly cheaper.
3) Wear Quality Socks(Preferably Hiking Socks)
The type of socks you depends on the climate. Around here, where it tends to be hot and humid, I try to wear the coolest sock/shoe combo that I can find. Sometimes that means I’m wearing hiking sandals with coolmax socks, other times I’m wearing trailrunners with a lightweight wool combo(these short Merrell Socks are awesome).
In these warm summer months I like to use thin, although not too thin, synthetic blends. Basically the same style of socks you would wear as a long-distance runner. These Saucony Performance Socks are lightweight and really help cut down odor.
Cooler/drier climates you’re better off using Merino Wool blends. Darn Tough Hiking Socks are awesome. They’re made out of a Merino Wool/Nylon/Spandex blend. It’s the perfect blend of comfort yet durable with an added bonus of being antimicrobial/antibacterial.
Try to avoid pure cotton blends if you have issues with feet sweat. Wet cotton is a recipe for feet that are rubbed raw.
Sock Fit is Crucial
Most blisters are caused by improperly fitting shoes/socks. Your socks can’t be so tight that the seams rub the sides of your feet or so loose that your feet slide around. There’s a fine line between too loose/tight and just right.
4) Try to Keep Your Feet Dry
Most of us don’t have to deal with getting our feet wet on short day hikes. However, there will be a time when you just can’t avoid getting a little wet. You might get caught in a storm, or there’s a stream you need to cross. Whatever it is your feet will eventually get wet.
I always carry around extra socks, Hikegoo and gold bond powder in my pack If you didn’t come prepared with dedicated hiking socks and anti-blister cream you aren’t screwed.
The key to protecting your feet is to show them a little extra care throughout the day. If your feet are wet stop every 30-45 minutes and have a drink. Take your shoes off and get off your feet(put your socks out in the sun). Who cares if you need to extend your trip an extra hour.
On long backpacking trips your feet will get wet. There’s no way to avoid it! You have to cross streams, trudge through mud and your feet sweat like crazy. By the end of the day your feet are absolutely soaked.
When you know your feet will get wet you need to lean into it. Personally, I wouldn’t recommend wearing waterproof boots(your sweat gets trapped inside). If you know you’re gonna get wet it’s better to wear trail runners and lightweight socks. I prefer merino wool blends on long trips(these are my favorite).
Once you get to camp make sure you air out your feet. Dry your boots out by the campfire and bring along dry socks and dedicated camp shoes. Don’t worry if your feet are swollen and pruny(that’s normal), let your feet breathe and set your socks out to dry.
5) Condition Your Feet Before Hitting The Trail
Make sure your feet are healthy before you head out on the trail. Try to treat foot fungus, ingrown toenails, bunions, etc before heading out. Make sure you head to the doctor for prescription meds if necessary.
The old school method of preventing blisters was to toughen them up with tincture of benzoin. Just apply the stuff on hot spot areas over the course of a couple weeks. It leaves a sticky resin that’s both tough, tacky and prevents rubbing. You can even stick your moleskin on top to stop it from rubbing away.
Toughen Up Your Feet
Before you head out on a long all-day hike wear your new boots in a couple short 4-5 mile hikes. Go out for an hour or 2 after work a couple times per week. You just need to make sure your feet are ready for longer hikes.
Toughen up your skin by walking barefoot around your house/yard. Walking around the pool barefoot, down the driveway, through the grass. Just try not to step on sharp objects.
6) Deal With Damaged Feet Before Your Trip
Head to the pediatrist before long trips if your feet are really bad. If they aren’t all that bad head to your local salon for a pedicure. You see all types of people at the nail salon.
Obviously, you’ll see lots of women, but you also have big burly construction workers, mechanics, firemen, etc. Just about anybody can benefit from a good pedicure and foot massage.
Calluses and Corns
Thick calluses and corns will crack on a long hike and that can be a serious problem. Use skin cream to prevent your feet from cracking. You need the callus to build up, but you don’t want it to become excessive.
Trim Your Nails
Keep your toenails trimmed and pay special attention to ingrown nails. Ingrown nails and sharp edges can really irritate your skin. Hiking socks can only help your feet so much.
7) Care For Your Feet on The Trail
Giving your feet a little extra attention on the trail is never a bad thing. Take extra breaks, even if you don’t think you need it. Air out your feet and take in the view for a couple of minutes.
Stop and rest your feet when they start to get tired. When your feet start to feel hot, sweaty, tired and sore it’s time for a break. Take your boots off, allow your feet to cool down and dry off.
It’s stupid to power through when your feet start to hurt(that’s how you get blisters). Give yourself a half-hour to cool off. As cliche as it sounds, hiking isn’t about arriving at the destination it’s about the journey to get there.
If after you start back up you still feel hot spots it’s time to stop, take off your shoes/socks and deal with the problem. Take out your first aid kit an apply some Hikegoo or Moleskin before the blister forms.
How to Treat Blisters on a Hike
There are two main trains of thought about dealing with blisters. Most doctors recommend that you leave the blister intact. This entirely has to do with preventing infection and permanent scarring.
I have one major problem with this line of thinking. On a long hike there’s no way that blister will stay intact. By the end of the day it’s going to pop, there’s no avoiding it.
Remember that I’m not a doctor, but I think your way better off popping the blister and immediately treating it with rubbing alcohol, antibiotic ointment and then covering it up. I don’t want to get the bacteria from my shoes into that fresh wound. Here’s how I treat a blister on the trail.
Treating a Blister on a Hike
- Blister still intact: If your blister is still intact you need to puncture it. Rub both your blister and a needle with rubbing alcohol wipes to kill any bacteria. Once sterilized puncture the side of your blister and drain out all the fluid.
- Torn Blister: When the blister has already torn you need to cut it back away from your loose skin. After removing the blister treat it with antiseptic ointment like Neosporin.
- Take a Break: Take a 20-30 minute break before heading back on the trail. Take off your socks and let your feet dry up. A short break will give the blister enough time to harden up a bit.
- Apply Moleskin: Once you’re tired of sitting around reapply rubbing alcohol and Neosporin. Cut off a piece of Moleskin to put over the blister area. Round off all the edges of the moleskin before applying. Rounding the corners will help prevent the moleskin from peeling. If you don’t have moleskin you can use bandaids or gauze.
Be careful with deep thick blisters. If the blister runs below the top layer of skin you should leave it intact. That’s gonna be seriously painful if you cut it off(you’re down to nerve endings). Just apply moleskin to the area to try to relieve the pain a bit.


