Cleaning out and sanitizing your water filter is a crucial step before putting it into storage. Think about everything you’re filtering out of the water. It’s filled with bacteria, viruses, protozoa, sediment, and who knows what else. Do you really want to leave all that junk in your filter over the winter? How do you clean and sanitize a water filter before putting it into storage?
There’s a simple three-stage approach to cleaning and sanitizing a water filter for storage. Start out by backflushing the filter with clean water, sanitize the filter with a bleach solution or cleaning tablets, and then let the filter completely dry before putting it into storage. You can’t let the filter freeze when the temperature drops.
Cleaning out and sanitizing your filter isn’t all that difficult. It shouldn’t take more than 20-30 minutes to backflush and sanitize the filter. Keep reading to learn the easiest way I’ve found to clean out backpacking water filters.
Why Do I Need To Clean My Filter At The End Of The Season?
Think about everything that goes into a waterway. There are all kinds of things building up inside your filter. All the sediment, bacteria, and god knows what else is trapped in the filter elements. Do you really feel comfortable storing your filter without backflushing and sanitizing it first? I don’t!
There are three basic steps that you need to take before putting it into storage: Step 1 Backflush, Step 2 Sanitize, and Step 3 Allow it to dry. First I want to explain why you need to perform each of these steps, but you can skip to the next section if you just want to get the job done.
- Backflush: Backflushing is just a fancy term for forcing water backwards through the filter. This is the step that gets rid of all the mold spores and sediment that slowly builds up throughout the season. If you don’t backflush the filter, it will clog up and be hard to draw water through. It’s really easy to backflush a filter so I like to do it every time mine gets used.
- Sanitize: The sanitation process is used to kill off all the bacteria, protozoa, and mold that’s stored in the filter. Personally, I like to use chemical drops/tabs like Aquamira’s Chlorine Treatment or Katadyn Purification Tablets. Just mix the solution in water and force it through the filter. Wait about 30 minutes and everything inside will be killed. This way you won’t have to worry about mold growing in the filter.
- Dry Time: This is one of those steps that will occur naturally over time, but it’s extremely important. Just set the filter in a warm, well ventilated spot and let it completely dry out. Never put a wet filter into unheated storage during the winter. The filter will freeze, crack, and allow bacteria to get through the elements.
In the next section I’ll start going over each of these steps in detail. Don’t Worry! The entire process shouldn’t take more than 20 minutes and it’s surprisingly easy.
How To Clean and Sanitize a Water Filter For Storage
As I mentioned above, there’s a simple three stage process for cleaning out a backpacking water filter. You can actually use this same process for cleaning out any standard water filter like a Brita Pitcher, home purification system, etc.
A Quick Note: Some manufacturers suggest slightly different procedures, but they all follow the same basic protocol. Force clean water through the system backwards to remove sediment and prevent clogs, use a sanitizing solution to kill bacteria/mold, and let the filter dry. It mostly depends on whether or not you can remove the filter element and how you hook up the backflush plunger.
Step 1: Backflushing Your Water Filter
Almost every backpacking water filter and purifier can be backflushed, but you might want to check the directions. Pump style filters like the Katadyn Hiker Pro have removable elements so you won’t need to force water backwards through them.
If you have a filter with a removable element, just take out the element and run clean water over the filter and sponge off the screen whenever you get home. This should help prevent clogging and get rid of sediment buildup in the filter. Most companies sell replacement filter cartridges (they can be expensive) so you can fix the issue if it ever clogs up.
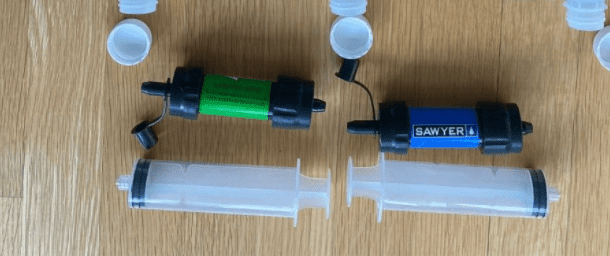
Inline systems and gravity filters generally use a plunger style system so you can force water backwards through the filter. My water filters come with a backflush syringe, but you can buy a syringe plunger (On Amazon) if you’ve lost yours. The following video will show you how to backflush your filter, but I’ll give a brief description below.
With proper maintenance you shouldn’t have to backflush water through the filter more than a handful of times. The key to preventing clogs is to backflush the filter every time you use it. You don’t want to let the sediment settle into the filter and harden up. I like to make sure I backflush the filter before it has enough time to dry out after a trip. It takes less than 2 minutes so I do it immediately after getting home.
If the filters dry, it’s best to run water the normal direction through the filter to get it wet before going through the backflushing process. Running clean distilled water or bottled water through the filter is best, but I’ve never had problems using well water.
Try not to use extra pressure while going through the backflush process. Go only as fast as the water will flow naturally and don’t force it. The filter will start to free up naturally after a few backflush cycles. If you regularly backflush the filter it shouldn’t take more than 3-4 flushes to get out all the sediment. It might take 10-20 flushes to unclog a seriously dirty filter.
Step 2: Sanitize The Water Filter
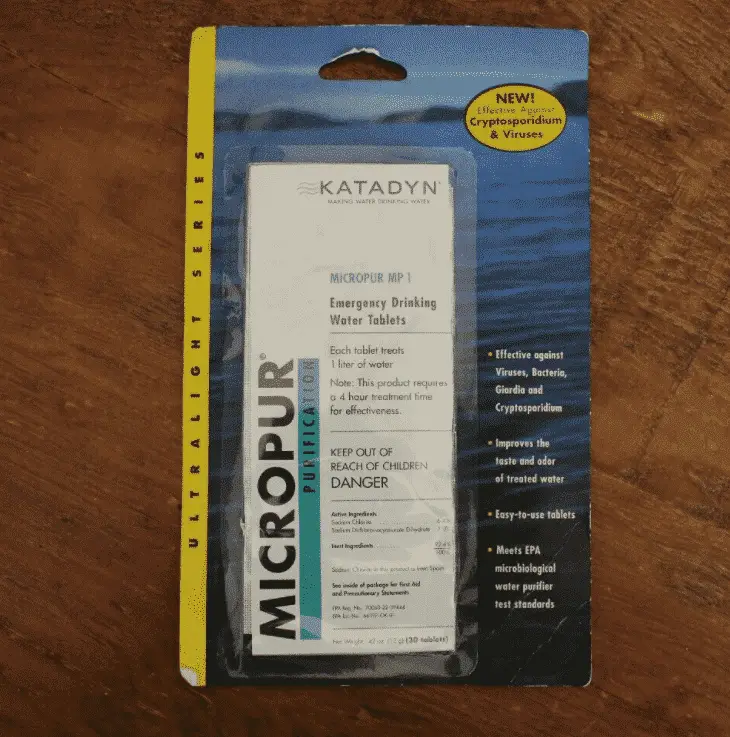
In this next stage, you need to run a sanitizing solution through your filter. I recommend using water purification tablets like Katadyn’s Purification Tablets. Those work really well, but I like the individually package Tagvo Purification Tablets. They’re technically not designed for water filters, but I think they’re the same thing.
If you’re in a pinch you can mix up your own bleach and water solution to sanitize the filter. Mix one capful of fragrance free bleach, with a liter of water. It’s the same type of household bleach that you’d use with your laundry. Just make sure you purchased the bleach recently, because it degrades fast (less than 2 years).
Sanitizing your filter will kill off all the microorganisms, mold, and bacteria in the filter. You don’t want all that junk to keep growing over the winter, because it can permanently clog the filter and damage the element.
Different manufacturers suggest slightly different procedures for the sanitzation process, so check the recommendations on their website. They all use the same basic process/solution, but the way you force the solution through the filter may differ.
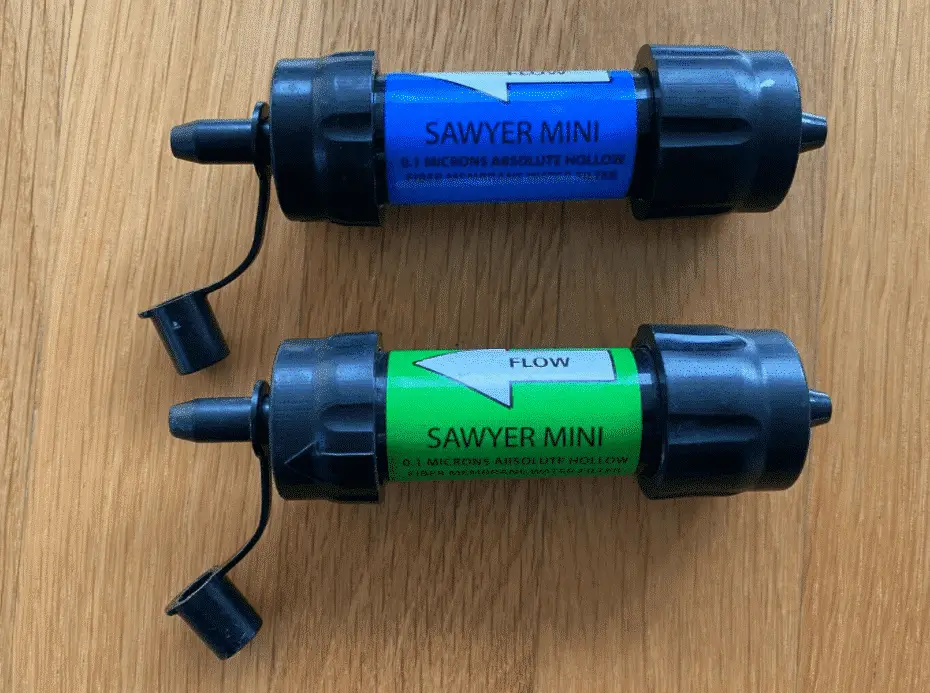
Hand pump filters use the built in pump to force water through and inline filters like the Sawyer Mini use a syringe plunger to force water through. The following video shows you how to sanitize a pump style filter, but you can sanitize inline filters the same way you’d backflush so watch the video above for a brief demonstration.
Step 3: Drying The Filter (This Prevents Mold Growth and Freezing)
Drying your filter before placing it into storage is one of the most overlooked steps. You just toss the filter with the rest of your gear in the garage and forget about it. It can take months for a filter to dry in a storage container in the garage or basement.
Think about it for a minute. You’re providing everything mold and bacteria needs to grow. There’s moisture from the cleaning process, no access to light, and cold temperatures. That’s a recipe for disaster!
There’s another major problem with forgetting to dry out the filter. The filter can freeze in the garage and you will never know there’s a problem. Once a filter freezes it’s basically trash since it lets bacteria slip through. I’ve ran into this problem and it isn’t fun. You’re miles away from civilization, puking, and constantly digging catholes. It’s not fun!
I like to let my water filter/purifier dry out slowly by placing it in a warm well ventilated location out of direct sunlight. It goes next to my furnace vent in cold weather or gets place by a window in the summer. Just set it there and forget about it for a week or so.
After that you can move it to a drawer or storage container in the heated part of your home. Once spring rolls around the filter will be clean and ready to use. I still like to backflush before using it to remove dust, but it should be safe regardless.
When Should I Replace My Filter?
There are 3 main reasons (excluding accidental damage) why you might need to replace your filter. Only you can decide if it’s worth buying a replacement filter, but I’ll give you a few times where it makes sense.
The filters clogged up and difficult to force water through the element. Inline filters like the Sawyer Mini are so cheap that it’s not worth messing around with a clogged up filter. There’s a certain point where there’s so much sediment buildup that you can’t free up the filter regardless of how many times you backflush.
You let the filter freeze over the winter. Allowing your filter to freeze will cause tiny microfractures that will let bacteria through. At this point the filter isn’t functionally sound so it needs to be replaced.
There’s a nasty taste in the filter that you can’t get rid of. First you need to think about where you’re getting the water. If you’ve recently used farm water runoff or tannic water this might be the cause. You can usually get rid of the taste with backflushing and sanitization. If that doesn’t work you can make a white vinegar solution and let the filter sit overnight. That usually solves the problem.
Mold is one of those things that’s almost impossible to get rid of once it starts to grow. You can kill the mold with sanitizer, but once it gets bad the taste will never go away. Try backflushing with a bleach solution and letting it soak in bleach to see if that works, but you may need to replace the filter.


