
Does the inside of your raincoat leak? If it does, you need to take a good look at the inside to check the seams. You should either see taped seams, or glue/plastic welded seams. If the tapes ripping/flaking apart or the glued seams are tearing you’ve found the problem. Luckily it’s easy to reseal your raincoat seams using wipe on seam sealer or waterproof seam tape.
How Do You Seal The Seams On a Waterproof Raincoat? Start by trying to peel off the old damaged tape with a credit card or rubbing away the plastic seam glue. It doesn’t have to be perfect. At this point you need to apply new seam tape and use a hot iron to melt the tape to the fabric or paint on seam glue to reseal the damaged plastic welded seams.
You’ll be surprised how easy it is to reseal old seams, but I’ll go into further detail below. Just make sure your jacket is actually leaking and there’s not a ventilation problem causing sweat and condensation. Most jackets that people think are leaking actually have condensation issues. Let’s start off by diagnosing your gear to make sure it’s actually leaking.
Check To Make Sure Your Jackets Actually Leaking
It probably seems obvious to you that your jackets leaking, but that’s rarely the case with new gear. Most waterproof jackets come from the factory with perfectly sealed seams and a durable waterproof coating applied to the outside of the jacket. They use heat to melt the thread to the fabric so it takes years of use and lots of wash cycles to wear through the waterproofing.
It’s rare for new gear to randomly start leaking over the first couple years. Older jackets might need to have their seams resealed, but that’s usually not the case with raincoats that were purchased over the last 5-10 years. So if it’s not the waterproofing, why is my waterproof jacket wet inside?
A wet jacket is usually caused by a ventilation problem. Poor ventilation leads to excessive sweating and condensation problems. The insulation in your jacket causes your body to heat up. If the temperature inside the jacket is warmer than the outside air condensation will occur soaking the inside of your jacket.
On hot days you’ll sweat, but even regular moisture on your skin can cause condensation on cold days. The moisture can’t escape through the waterproofing so there’s nowhere for it to go. It forms a layer on the ventilation membrane on the inside of your jacket and the cooler air from the outside causes condensation to occur. It’s just like condensation forming on the outside of a glass of cold water.
So how do I know if my jackets actually leaking? It should be fairly obvious on older waterproof raincoats. If a moisture problem randomly pops up it probably means you need to check your seams and apply waterproofing spray (Nikwax or Kiwi Camp Dry)to the outside of the jacket.
If you’re unsure of where an old jackets leaking or you’re trying to test a new jacket, you’ll need to put it on and use a hose to spray it down with water. This gets around the ventilation issue since you won’t have enough time to soak the inside of the jacket. You need to focus your waterproofing efforts wherever you get wet.
What Do I Need To Seal My Jacket Seams?
I recommend using a two stage approach to sealing your seams. This is a little overkill, but it should help ensure the seams stay sealed for the long haul. You can save some money by only doing one method or the other, but a little bit of redundancy is never a bad idea.
Seam sealer is easier to do, but it’s only a temporary fix. Using seam tape is more permanent, but it’s harder to do and there’s more of a chance to mess up and not fully heat shrink the tape. That’s why I like to do both methods so there’s less of a chance to screw things up. So what do I need to seal my jacket seams?
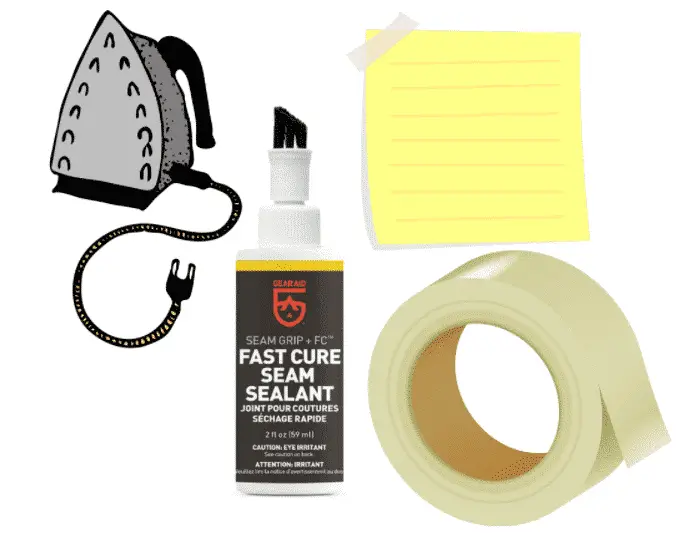
- Clothing Iron: You need the iron to heat up the seam tape so it adheres to the fabric. Without heat the seam tape will come up fast.
- Piece of Paper: You need to have a piece of paper to go between the iron and the tape/fabric. This serves two purposes. It protects the fabric so it won’t get burned and keeps the seam tape off your iron. The tape shouldn’t stick to the iron if it’s set between 300°F-320°F, but irons aren’t precise instruments so they can run hot. You don’t want the tape to goop up and stick to the iron. It’s easier to toss paper out than slowly pick burnt tape off an iron.
- Seam Tape: Seam tape can be hard to find in person so I recommend purchasing it on Amazon. Joann fabrics also carries it, but it’s only 1/2 inch wide so it can be hard to get the tape straight over the seams. Applying seam tape to your jacket is a semi-permanent solution that should last at least 15 years. It will eventually start to peel/fray so you may need to reapply tape or touch up the problem areas with seam sealer. This usually happens in the underarms or around the hood where there’s lots of movement.
- Seam Sealer (Optional): There are a few different types of seam sealer available, but Gear Aid Seam Sealer is by far the easiest to find. You can get it at any outdoor store and it’s easy to apply. Seam sealers are a great temporary fix, but you’ll have to reseal the seams every season if you wear the jacket regularly and toss it in the washing machine. Coghlan’s Water Based Seam Sealer (also at Walmart) is a little bit cheaper and should work, but it’s water based which makes it harder to use.
You Should Waterproof The Outer Layer Of Your Jacket Also
If you’re going to take the time to reseal are your jacket seams, I also recommend refreshing the Durable Waterproof Repellant coating. This isn’t entirely necessary, but if you’re jacket seams are going the DWR coating will right behind it. There’s no point in waterproofing your seams if the rest of the jackets letting in water.
DWR sprays are cheap and it only takes a minute to spray on. Buy a bottle of Nikwax or can of Kiwi Camp Dry to spray down the outside of your jacket. Just spray some water on the jacket and wipe it down to remove caked on dirt. Spray the jacket with the DWR spray and give it time to dry.
All it takes is a single coat so you should be good to go after it dries. It should help seal the outside of your seams as well, and there should be plenty to spray down the rest of your gear. Spray it on your shoes, tent, backpack, waterproof pants, furniture, tarps, and any other fabric you want to repel water.
How To Seal The Seams On A Waterproof Raincoat
Resealing your raincoat seams is a fairly straight forward process. It doesn’t matter what type of raincoat you have or what it’s made out of. The seam sealing process is always the same. Just make sure the jackets actually waterproof and not water resistant by checking the seams. Water resistant jackets can be sprayed with DWR spray so they repel water, but it needs to be reapplied every season.
If you see seam tape anywhere on the jacket or a welded seam you know the jacket can be completely waterproofed. Some jackets only have seam tape on the shoulders and around the hood. These jackets aren’t technically fully waterproof from the factory, but it will be once you seal the rest of the seams.
If you see thread where the fabric was sewn together that usually means the jackets water resistant. Sealing the seams will definitely help, but you will also need to apply a DWR spray to the outside of the jacket so it resists water as well. Nylon and polyester jackets are commonly marketed as raincoats, but they’re actually just water resistant so they definitely need to be sprayed with Nikwax or Kiwi Camp Dry so they won’t absorb water.
Resealing the seams on your jacket is easy! All you need is an iron, piece of paper, seam sealer, and seam tape. The entire process shouldn’t take more than an hour once you have everything together. How do I seal the seams on a waterproof jacket?
- Flip The Coat Inside Out: Turn the coat inside out and place it on a flat surface that’s easy to work on. A kitchen table is perfect for this, but make sure you put down a towel before you start ironing.
- Inspect The Seams: Check out all the seams looking for problem areas. You may notice pulled up tape and fraying areas with taped seams. Inspecting welded seams isn’t important if you’re resealing the entire coat.
- Clean Off Damaged Areas: Pull away loose tape and scrape away fraying areas with a credit card. You don’t have to get it perfect. Just try to remove most of the loose stuff so the you can get a decent seal. Applying seam sealer in the next step will help hold down the tape that you couldn’t scrape off.
- Apply Seam Sealer To The Seams: This step is optional, but it seems to help the seam tape apply to the fabric. I always use Gear Aid Seam Sealer on all my gear. It can be used on tents, packs, shoes, tarps, and just about anything else you want to resist water. I like to hang my jacket up inside out on my shower rod so it’s easier to apply and has somewhere to dry. Just run the seam sealer over all the seams and give it 2 hours to fully cure.
- Roll Seam Tape Over The Seams: Once the seam sealer is dry you can start applying seam tape over all the seams. You can pick up seam tape on Amazon. Two meters should be more than enough to do a raincoat, but you might want to pick up more to seal your pack and other gear since the process is the same. The tape should stick to the jacket, but you need to melt it in with an iron so it’s fully cured.
- Set A Towel Down To Protect Your Table: Set a towel down on your table to protect the surface before using the iron. You can use an ironing board, but that’s harder for me.
- Place Paper Over The Seem Tape: This is a really important step that I’ve forgot in the past. You should always set a piece of paper over the seam tape to protect the fabric from burns and keep the iron clean if it’s running hot. If the irons above 320°F it can melt the tape and goop up all over the iron. Tossing out a piece of paper is easier than cleaning gooped up tape off the iron.
- Heat Up The Iron and Start Ironing: Set the irons temperature on medium or anywhere between 300°F-320°F. It needs to be hot enough to melt the seam tape without burning the fabric. Run the iron across all the seams checking to make sure the tapes melting without sticking to the paper. Make sure the irons fully heated, but you might have to adjust the iron temperature up or down depending on how it looks.
- Look Over The Seams For Problem Areas: Inspect all the seams to make sure you didn’t accidentally miss an area. Pay special attention to the hood and under the armpits. Those areas have lots of seams and require extra spins to go around the circular seam.
- Apply a DWR Coating (Optional): This is the perfect time to apply a waterproof coating to the outside of the jacket. Some fabrics don’t need it, but DWR sprays are cheap so you might as well spray it on. It’s safe to use on almost every type of fabric so it can’t hurt.
Do I Need To Repair All The Seams?
Technically you don’t need to repair all the seams, but I highly recommend it. You don’t want to take the time to repair part of your jacket and have to fix another area 2-3 years later. Once the seam tape starts to fray and pull apart in one area it will start to happen everywhere.
It’s so much easier to do all the seams at once. You have everything you need in one place, the irons hot and you’re already rolling on seam tape so the hard parts over. Doing all the seams won’t take more than 10 more minutes, so it’s not worth taking the easy way out.
Inspect The Seams To Figure Out What Type Of Seams You Have
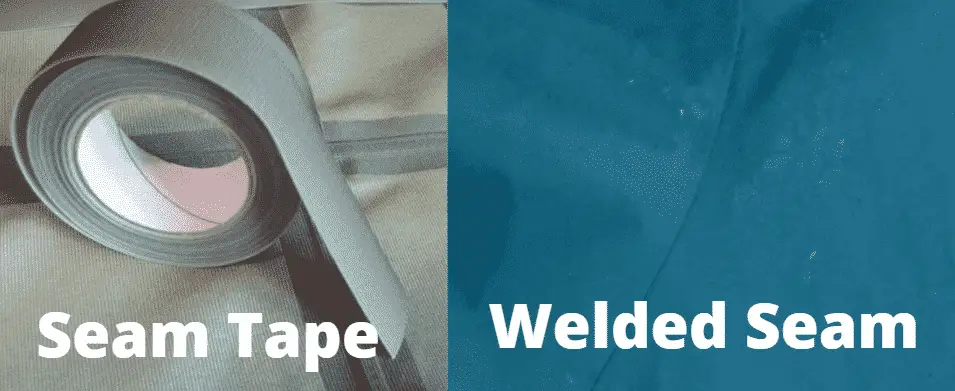
Manufacturers use two different types of seam sealants to waterproof their jackets. They either tape the seams or use a plastic coating welded into the seams to hold them together. Both of these methods are highly effective, but they do have their problems.
Let me be perfectly clear! It really doesn’t matter what type of seams you have if you followed the instructions above. That method can work on any type of seam. I’m only explaining this so you’re not looking for frayed and pulled up seams when you should be looking for a small crack in a welded seam.
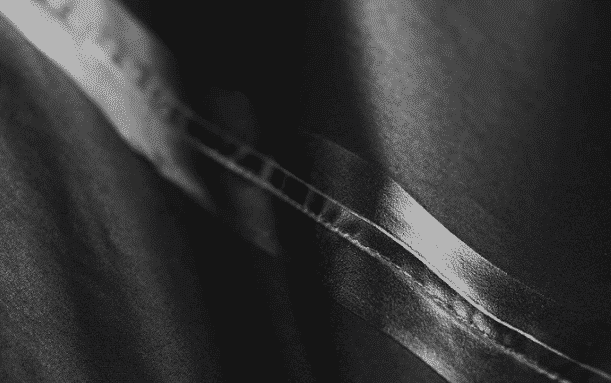
- Seam Tape: Seam tape is a strip of waterproof tape that’s rolled over the tops of all the seams on your jacket. Once the tapes applied you have to use heat to melt the tape into the fabric. Seam tape can be used on any type of fabric that has seams that are sewn together with a sewing machine and thread.
- Welded Seams: Welded seams use a plastic glue and heat to weld two pieces of waterproof fabric together. Welded seams are only found in jackets that are made out of breathable plastic material.
- Critically Taped Seams: Jackets with critically taped seams use seam tape over the most important areas that need to be waterproofed. They usually have waterproof seam tape over the shoulders and hood where rain usually lands. These jackets aren’t entirely waterproof so you might want to run additional tape over the other seams.
Seam tape should be easy to spot. It looks like a strip of tape running over all the seams. This is a really effective way to seal the seams, but looks kind of ugly. Waterproof fabrics like Goretex and vinyl that need to be sewn together use seam tape since they can’t be hot welded.
Seam tape can get worn down, start to fray and pull apart from the fabric. Welded seams can pull apart at stress points where your body moves and rubs against the fabric. If there’s only seam tape on the shoulders and hood that means you have “critically taped seams”.
I would try to avoid jackets with critically taped seams. Seam tapes only applied to fail points on the jacket, so they’re not actually waterproof. The seams are only sealed around the shoulders and hood, because that’s where most rain lands. This isn’t a big deal in light rain, but heavy rain will soak your arms, and on your sides under your arms. You can always seal the seams using seam sealer (gear aid seam sealer), but that will need to be reapplied every season.
Welded seams can be harder to spot since there’s no visible weld, but they have one tell tale sign. The fabrics molded together using heat so it doesn’t have to be sewn together. If you see visible thread without seam tape that means your raincoat isn’t actually waterproof (just water resistant).
This is usually found in nylon and polyester jackets that are advertised like raincoats and look like they’d be waterproof, but actually let water in. You can still increase the waterproofing with DWR Spray (Nikwax or Kiwi Camp Dry) and seam sealer (Gear Aid Seam Sealer), but you’ll have to reapply often. I would avoid using waterproof seam tape, because it’s easy to burn the fabric with the iron.
When Do The Seams Need To Be Resealed?
It should seem obvious, but you need to reseal the seams whenever they start leaking. With seam tape this usually means the tapes starting to fray or pull away from the jacket. Welded seams can pull apart and cause gaps in the fabric.
I recommend repairing all your seams with a combination of seam tape and seam grip. This way you know the seams are secure and you can use the same method for both welded and taped seams. Scrape away all the frayed tape and pull up loose edges. Run a light coat of Gear Aid Seam Sealer over the seam and then coat it with additional seam tape to further seal the area.


