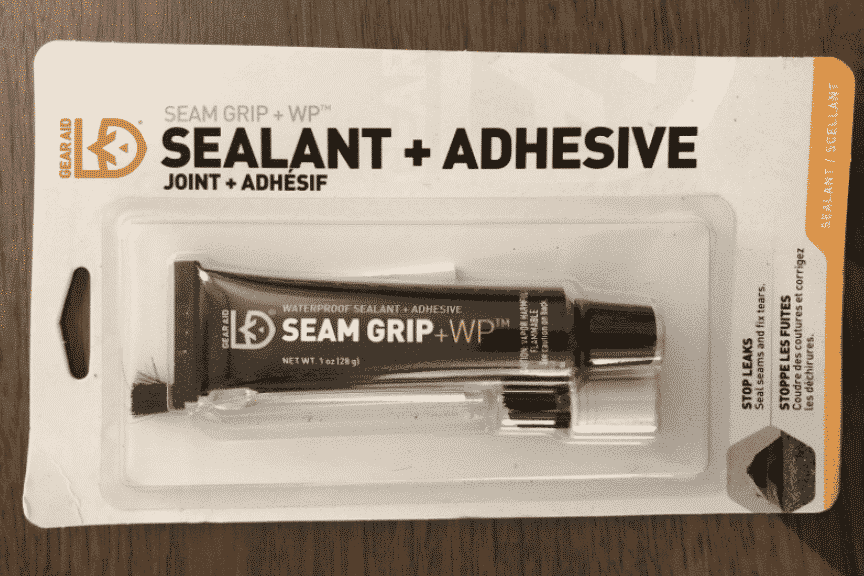
Seam sealing a tent can get expensive if you’re planning on doing all the seams. I went through 4 tubes of Gear Aid Seam Grip when I went over my 3 person tent a few years ago and that was only doing the main seams. After doing a little bit of research and experimenting with a few products I came up with a DIY seam sealer that works as good as the store bought version.
How do you make homemade tent seam sealer? You can make a DIY homemade seam sealer out of mineral spirits and a tube of 100% clear silicone caulk. Mix the concoction up at a 50/50 ratio of silicone and mineral spirits. This gives your mixture a similar consistency to olive oil, which makes it easier to get clean even seams that don’t peel. Increasing the silicone will make it more like commercial products
Try to thin out the seam sealer until it’s thick enough to stick to the brush, but thin enough so it won’t run. Thinning out your seam sealer will make it easier to apply and a little bit goes a long way. It shouldn’t take more than one thin coat to get a professional looking waterproof seam.
What Do I Need To Make Homemade Tent Seam Sealer?
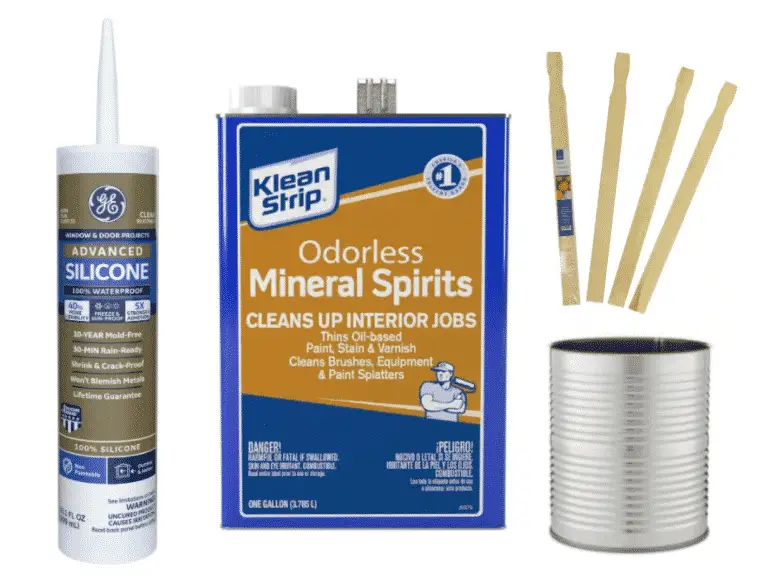
You don’t need all that much to make homemade tent seam sealer. All you need is a tube of 100% silicone caulk, a bottle of mineral spirits or paint thinner, small disposable container, and a mixing rod (paint mixing stick, popsicle stick, pencil, etc).
- Clear 100% Silicone Caulk: Look for clear 100% Silicone Caulk at any home improvement store. It’s the same stuff you use to seal around windows. I’ve always used GE Advanced Clear 100% Silicone Caulk. Tubes of silicone caulk are the cheapest option and will cover 100 linear feet once it’s mixed, but you need to have a caulk gun. You can buy a caulk gun on Amazon, but you can get one for like $5 at any home improvement store. There are smaller squeeze bottles of silicone available that would be able to handle 30-40 linear feet once you mix it with mineral spirits.
- Mineral Spirits or Paint Thinner: Any paint thinner will work, but I always keep a bottle of mineral spirits in my garage so that’s what I use. You can buy mineral spirits online, but it’s much cheaper to pick it up at a hardware store. You need less than a tablespoon for an entire tube of Seam Sealer so get the smallest bottle you can find.
- Tin/Aluminum Can or Disposable Plastic Container: You need something to mix the seam grip and paint thinner in that can be thrown away. Seam sealer dries fast so it will ruin whatever container you’re using to mix the product. I used a red solo party cup the last time I made seam sealer, but any small plastic or metal container will work.
- Mixing Stick: Any small mixing stick will work, but it needs to be disposable. I have a bag of popsicle sticks that I picked up at Walmart. You can pick up a free paint stirrer at most home improvement or paint stores.
That’s everything you need to make homemade seam sealer, but you’ll also need a small handful of things to apply the finished product. Buy a cheap brush that you don’t mind throwing away, wet rag, and old credit card, playing card, etc. to smooth out the seams. I like to use a foam brush since you can get an even professional look, but any small paintbrush will work.
How To Make Homemade Tent Seam Sealer
It’s surprisingly easy to make homemade tent seam sealer! All you need is mineral spirits (or paint thinner), 100% silicone caulk, and a way to mix it. You may have mineral spirits or some other kind of paint thinner in your garage. I’ve always used GE Advanced 100% Silicone Caulk, but any 100% silicone caulk will work. So buy whatever product is the cheapest.
You can order silicone caulk online, but it’s better to pick up mineral spirits from your local home improvement store. Check out the price of mineral spirits on Amazon and then look at your local Home Depot, Lowes, Walmart, etc.. I’d be willing to bet that it’s about 3 times more expensive to order a gallon of mineral spirits online.
Now that I went over what you’ll need, how do you make homemade tent seam sealer?
- Find A Small Disposable Container: Find a small metal or plastic container that you don’t mind ruining. Glass mason jars, pickle jars, etc. will also work. Silicone starts tacking up after 3 minutes and will be dry to the touch in 30 minutes so it will be hard to clean out the container once you’re done.
- Pour Silicone Into Container: If you’re using a standard 10.1 oz tube of caulk you won’t need to use the entire container to do a single tent. A typical 3-4 person tent has about 30 linear feet of seams and a full tube can handle 100 linear feet so you could cover 3 average sized tents with a single tube. You can use half of the tube (with leftover mix) if all you’re doing is a single tent.
- Consider Making A Large Batch For All Your Gear: Mixing up the homemade seam sealer is the hardest part, so this is the perfect time to make a large batch to go over all your gear(sleeping pad, pack, tarps, tent footprint, etc.). Silicone caulk dries fast so you’ll need to throw out the other half, and a quart of mineral spirits is like $8 so you won’t be wasting more than $2-$3 if you don’t use it all. Just try to leave a little bit of silicone in the tube so you can adjust the mix if it needs to be thicker.
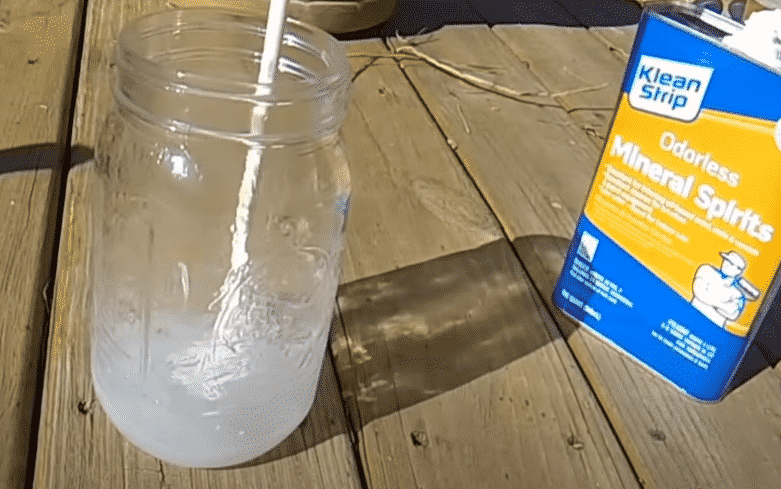
- Mix In Mineral Spirits or Paint Thinner: Start pouring in your mineral spirits at a 50/50 ratio. That’s one part silicone to one part mineral spirits. Be careful mixing in the mineral spirits if you used the entire tube of silicone in the previous step. You can always add more mineral spirits to thin it out, but you don’t have extra silicone to thicken up the mixture if it’s runny.
- Measure or Eyeball The Mix: Mixing together a silicone sealer isn’t an exact science so accuracy isn’t all that important. You can weigh or measure out the ingredients to get exactly a 50/50 ratio, but I usually eyeball it. I fill the container halfway with 100% silicone caulk and then add in mineral spirits until it looks right (look at the next step).
- Check The Mixtures Consistency: Homemade tent seam sealer should be the consistency of olive oil. Aim for a 50/50 split and make slight adjustments to the mixture until it moves around like olive oil in the container. If it splashes around like water you need to mix in more silicone. A thick gloopy mess of silicone needs more mineral spirits.
- Try It Out Before Applying: Once the DIY seam sealer looks decent it’s time to test it out. Dip your paint brush in the mix and pull it out. You should have a thin coating stuck to the brush with minimal dripping once you wipe off the excess seam sealer on the side of the container. If it’s still runny and won’t stop dripping you need more silicone. Dipping the brush in and pulling out a thick glob means you need more mineral spirits.
Applying Homemade Seam Sealer
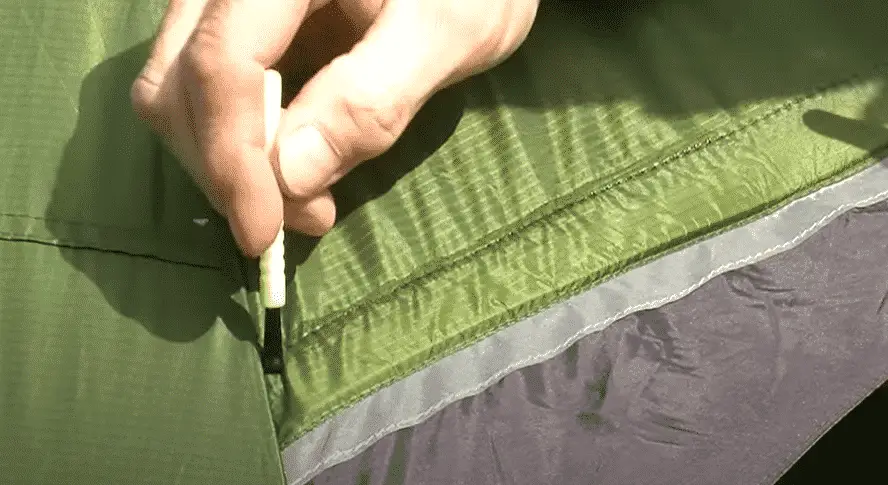
Applying seam sealer is fairly straightforward so I won’t go over it in detail, but here’s a brief overview. You should always apply the seam sealer on the outside of your tents seams. The inside of a tent already has sealed seams so going over the outside of your tent will provide a better waterproof seal.
If the inside seams are peeling or fraying you might want clean them up, but it’s not necessary. Cleaning up your inside seams will look better, but you would have to pick off all the fraying/peeling seam seal so it’s a lot of work.
Clean off all your seams with soap/water. Take the homemade sealer and apply a thin coat with your paint brush (I prefer foam brushes). Applying a thick coat will lead to an uneven finish that will peel after 2-3 years.
Seam sealer takes about 3 minutes to harden so work on small sections and clean them up as you go along. Run over the seam with a business card, playing card, or old debit card at an angle to even out the coat cleaning up any thick spots.
You should also have a wet rag ready to wipe up mistakes or spills. Silicone dries fast so there won’t be enough time to grab a wet rag if you make a mistake. If you miss a spot, you will have to wait until it dries and slowly pick off the dried silicone.
Homemade seam sealer takes 3 minutes to start tacking up, be dry to the touch after 30 minutes, but it will still feel tacky. It takes at least 24 hours to dry out completely and putting the tent away early will damage the seams. If it still feels tacky after 24 hours you can apply a thin layer of talcum powder to deal with it.
Apply A Thin Even Coat For Clean Professional Seams
The key to applying homemade seam sealer is the thinning out the consistency. You want to apply a thin even layer across the entire length of the seam. If it’s too thick, you’ll end up with uneven layers that will gunk up and peel away.
That’s where most of the commercial products get it wrong. They use concentrated solutions that are hard to apply. Whenever I’ve used Gear Aid Seam Grip it ends up balling up and peeling away after a year or two. Maybe that’s how they convince you to buy more product, but it looks terrible.
How Long Does Silicone Caulk Seam Sealer Take To Dry?
Applying a thin coat of seam sealer is the key to using any type of seam sealer. If it’s too thick it will take forever to dry and gum up leaving a tacky feel. You can apply a thin coat of talcum powder to make it less sticky, but the uneven layers will start to peel away and crack.
Homemade seam sealer will start to gunk up and harden after 3 minutes and be safe to touch after 30 minutes. It will look and feel dry, but it takes at least 24 hours to completely dry out. If you don’t wait until it’s completely dry it will stick to the surrounding fabric and peel away when your tent out of storage.
How Many Coats Of Homemade Seam Sealer Do I Need?
You shouldn’t need more than one coat of seam sealer. That’s assuming you put on a consistent even layer and did the necessary prep work. Make sure you check the seams after applying the sealer and keep an eye out for thin or missed areas. Pay special attention to the corners where it’s hard to squeeze in the brush.
Clean off the old seams using soap and water and pick away at the old cracked peeling seams. Don’t worry about getting all of it off! Just pick off whatever’s loose, because it will cause bubbles in the finished product.


