Everybody knows that cold temperatures keep harmful bacteria from growing. So wouldn’t that mean you don’t have to purify water in the winter? That’s one of those myths that just won’t go away.
Table Of Contents
Do You Need to Purify Water in The Winter?
Water treatment and purification methods are just as important during the winter as it is in summer. While bacteria might not thrive in cold weather, you still have leftover protozoa, bacteria from the summer.
Dropping temperatures might slow down bacteria/protozoa growth, but it’s not going to kill it. When temperatures drop, the only thing that changes is the purification methods you need to use.
Your Water is Going to Be Contaminated
With deer, mice, bear, raccoons, etc all calling the forest home you end up with a lot of water contamination. Add in all the industrial/chemical pollution and you’re dealing with some nasty water. It doesn’t matter where you are in the world the water will be contaminated.
Is it safe to drink water from a creek or stream?
The old idea that running creeks/streams are safe to drink just isn’t true. While running water might look pure it’s still going to be contaminated with bacteria, viruses, parasites, etc.
It’s probably better than stagnant water, but you still need to filter out bacteria and protozoa. Drink without purifying and there’s a good chance you’ll end up with Salmonella, E. Coli or Cholera.
Luckily, it isn’t all that hard to filter out dangerous contaminants. It gets harder in the winter, but with the right methods you can safely purify water.
How to Purify Water While Camping and Backpacking in The Winter
I’m sure you have a favorite way to purify water during the summer. The good news is most summer purification methods can be carried over into the winter.
You will, of course, have to make some slight modifications in cold weather. These are the main problems you’ll have when temperatures drop.
Common Winter Purification Problems
When the temperatures drop you need to actively stop your water filter from freezing. To prevent freezing carry the filter in your pocket and toss it in your sleeping bag at night.
Check out my post on preventing a water filter from freezing.
Don’t even think about using liquid chemical purification drops in the winter. Although very effective, bleach will freeze. Instead of using drops use chemical purification tablets like Potable Aqua Tabs(On Amazon)
Batteries tend to be unreliable in cold weather. Make sure your batteries are fully charged before heading out and try to keep the UV Purifier warm. The Steripen Ultra Purifier(On Amazon) is small enough to keep in your pocket.
It seems counter-intuitive, but you need a few cups of liquid water to boil snow. If you don’t start off with “Seed Water” in the pot you’ll end up burning a hole in the bottom.
It takes longer to chemically purify water in the cold. Tablets like Potable Aqua Tabs(On Amazon) work really well in the winter, but instead of taking 30 minutes it will take more than an hour.
What’s The Best Cold Weather Water Purification Method?
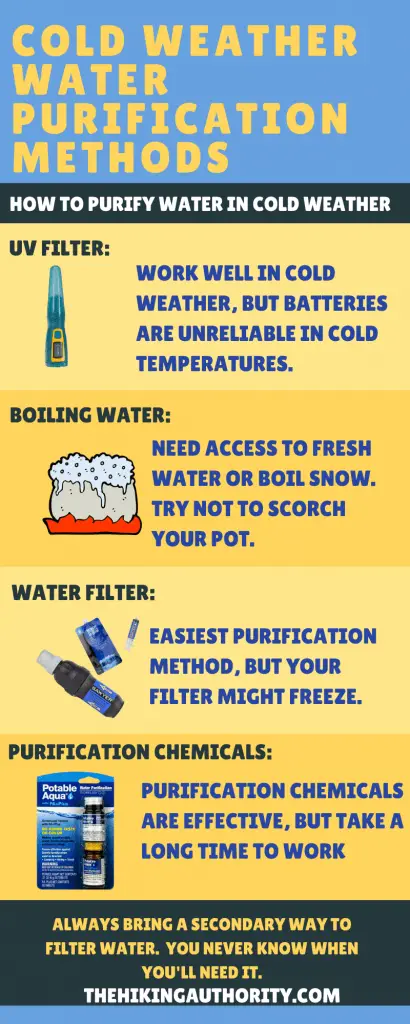
So what’s the best cold weather water purification method? As with everything in life it depends on the conditions. It’s entirely dependent on whether or not you need to melt snow.
If you don’t have access to liquid water the only option is to melt snow. With liquid water you have a few options to choose from. Here’s my favorite winter water purification methods in order of best to worst.
- UV Light Purifier: This is my favorite cold-weather purification method, but you need access to liquid water. Considering how hard it is to find open water this is easier said than done. If you’re looking for a UV Purifier definitely go with the Steripen(On Amazon).
- Boiling Water(Melting Snow): If you can’t find water you’ll have to make your own by melting snow. Melted snow is usually safe to drink, but you should definitely boil it to be on the safe side. Obviously, boiling water will require a stove.
- Water Filter: Water filters are extremely effective, but you need to keep them from freezing. If you let the filter freeze you might as well throw it in the trash(this is how you keep the filter from freezing).
- Chemical Treatments: I always carry chemical tablets as a backup water treatment method. For the price, you can’t beat Potable Aqua Tabs (On Amazon). Just remember that it will take longer to chemically purify water in the cold.
Finding Open Water isn’t Easy
All you need to do is find open water. Doesn’t that sound easy? Just go on down to the nearest lake/river and there you go. Obviously, it’s not going to be that easy once the water starts to freeze.
Finding open water in the winter can be nearly impossible. To make matters worse, wading out on the ice is downright dangerous. Miles away from civilization falling through the ice is gonna be deadly.
You might be able to claw your way out of the water, but it’s unlikely. You’ll probably need to use some type of tool(Ice Axe or Ice Picks). As an avid ice fisherman, I just carry around my Frabill Ice Picks(On Amazon) just in case. Even if you do get out you’ll probably freeze to death without immediate medical attention.
Personally I would never recommend venturing out onto the ice. Instead, try to chip your way down to freshwater so you never have to step foot on the ice. You might be able to extend your reach by attaching your water bottle/cup to the end of your trekking pole.
Look For Moving Water
Fast-moving streams will most likely be your best bet at finding open water. They’re easy to access and most of the time the ice isn’t all that thick. With minimal effort, you can typically smash through the ice. Just take a big rock and toss it into the ice to see if it will break.
Snow Melting is The Way To Go
Unless you can find a safe water source, snow melting is the way to go. The only problem is snow melting requires a lot of fuel. Plan on carrying at least 8oz of fuel per day/person for your camp stove(depends on your stove).
Wood burning stoves are more reliable on long backpacking trips or when traveling with groups. Check out my post on the different styles of wood backpacking stoves.
Using a UV Light Purifier
In the past 5-10 years UV Water Purifiers like the Steripen(On Amazon) have became increasingly popular. The only problem with UV Purifiers is that you need to have access to liquid water. If you don’t have access to liquid water continue reading below for my snow melting method.
This is by far my favorite water purification method in the winter. I’ve been using a Steripen for the past couple years and it’s so easy to use. It only takes 90 seconds to purify water and you get like 50 treatments on a single charge.
It’s crazy how fast UV Light kills germs, bacteria, viruses and protozoa. FYI UV light is one of the only methods on this list that can kill viruses. So how do you use a UV Water Purifier?
Although the process is slightly different between models, generally you just dip it into the water, turn on the switch and when the light goes out you’re good to go. After that, the water is safe to drink and doesn’t have any taste.
Technically it doesn’t purify water on the rim/outside of the container so keep that in mind when you go to take a drink. Just wipe off the rim before you go to take a drink.
Boiling Water and Melting Snow
Technically you don’t actually need to boil water to completely kill bacteria, parasites and protozoa. You just need to get the water temperature up above 160 degrees. It’s nearly impossible to tell the temperature of water without a thermometer so just plan on boiling the water.
Everybody knows how to boil a pot of water so I won’t go into extreme detail here. Just heat up your pot of water and wait. Remember that we need at least 1 Liter of Water for every 2 hours hiking on the trail. So you’ll need to purify a lot of water.
Melting Snow
Although it seems like a fairly straightforward process melting snow can be tricky. There’s one major thing that prevents people from successfully melting snow.
You need a few cups of liquid water(aka “Seed Water”) to successfully melt snow. Without water in your pot, you’ll end up with a gaping burn hole in the bottom. If you plan on melting snow make sure you carry at least a water bottle worth of liquid water and don’t let it freeze.
- Setup: Setup your stove on a level surface trying to protect it from wind. You can conserve fuel and speed up the boiling process by blocking the wind.
- Gather Snow: Gather a large amount of snow. It’s like 5-10 times the volume of snow compared to water(depending on density). You’ll need a big pile nearby.
- Grab Your Big Pot: You need to use at least a 2 Liter(or larger) pot for melting snow. Due to the unstable surface of cooking stoves, you want a wide bottom pot(tall, narrow, low volume pots won’t work). MSR’s 2.5 Liter Reactive Stove System(On Amazon) is a perfect size.
- Add “Seed Water” to Pot: Before you can start melting snow you need to add a few cups of liquid water to the pot. If you don’t start off with water you’ll end up burning a hole in the bottom of your pot. You need to keep at least 1 inch of water in your pot at all times.
- Start Adding Snow: Start off slowly adding snow to the pot. Obviously you should only add snow that looks clean.
- Throw on The Pots Lid: Putting on the pots lid will speed up the melting process and conserve fuel.
- Stir and Add More Snow: To speed up the melting process stir the snow into the melting water.
- Remove Water From Pot: As you continue to melt snow start removing the water with a cup and pour it into your water bottle or storage vestibule.
- Filter Particles: Filter out particulates (pine needles, twigs, and dirt) if you want. The easiest way to filter water is to use a coffee filter or clean bandana.
- Water Still Needs to Be Purified: Even though you’ve melted the snow you should still purify the water. Any purification process will work, but boiling will be easiest since you’re already setup.
Water Filters (Don’t Let Your Filter Freeze)
Water filters are extremely popular among 3-Season backpackers, but it’s not the best choice in the winter. While they might be extremely effective and fast working, water filters tend to freeze in the winter.
Once the water filter freezes you’re screwed. The freeze and thaw cycle causes the filter to seize up and crack when it thaws. At this point, you might as well toss the filter in the trash, because it’s not going to ever work again.
How to Prevent Freezing
It’s actually pretty easy to keep your filter from freezing, but you have to be careful. Always have a secondary treatment method(Purification Tabs) just in case.
For more info check out my post on stopping a water filter from freezing.
On the trail, just put the water filter in your pocket so that it won’t freeze. This method works really well down to about 10-15 degrees. Below that you should probably switch to another treatment method or toss a hand warmer in your pocket.
At night you will have to keep the filter in your sleeping bag. Toss the filter in a gallon-sized Ziploc bag and toss it in your sleeping bag. Your body heat will keep the filter from freezing. If temperatures drop so low that the filter freezes in your bag you’ve got worse problems to deal with. You might want to check out my post on freezing in your sleep.
Chemical Water Purification
Personally, I’m not a huge fan of chemically purifying water. Although chemical treatments are extremely effective, it takes forever to work. In the summer purification tablets take 30 minutes, but in the extreme cold, it can take hours. You never really know if the water is safe to drink.
That being said I do always carry a bottle of Potable Aqua Tabs (On Amazon) in my first aid kit. For the price, you can’t beat it as a secondary water treatment method. You don’t have to worry about the tablets freezing like bleach/iodine-based treatment methods.
Just remember that you will still need access to liquid water so you might need to melt some snow, which kind of defeats the purpose.
Don’t Use Liquid Purification Chemicals
Lots of backpackers depend on Chlorine Based products like Aquamire during the summer, but those won’t work in cold weather. Although technically freeze-thaw stable in extremely cold temperatures it’s going to freeze.
You can thaw it out by keeping it in your jacket, but who wants a frozen bottle of ice in their jacket.
Storing Water On a Winter Camping Trip
How can you store water after you purify it? If you’re not careful your water will freeze in a matter of hours. There’s a couple of lines of thought on this.
Most people recommend using water containers specifically designed to prevent freezing, but you can sometimes get away with using a hydration bladder on day hikes(If You’re Careful).
On longer trips, you should go with an insulated water bottle designed specifically for winter backpacking.
Start Off With Hot Water
It probably seems obvious, but hot water will take longer to reach freezing temperatures. Fill most of your water bottles up with hot water so they will last longer before freezing.
Personally, I always set one bottle off to the side in the snow so I can start off drinking cold water. I just prefer cold water so I drink that bottle before it freezes.
Don’t Use a Metal Bottle
Don’t even think about bringing a metal bottle on a winter hike. The light ones(like Hydroflask) freeze way too fast and the tops freeze and double-walls(like Yeti) are way too heavy to carry.
Think about it, your Nalgene bottle weighs 6.2oz and a Yeti Rambler weighs 30oz(aka 2lbs) your talking about a 6lb difference spread over 3-4 bottles. That’s about the same weight as my tent, sleep system, and pack combined on a typical hike.
Nalgene’s With a Bottle Insulating Sleeve
You most likely already have one of those 32oz Nalgene Water bottles somewhere in your house. Pair your Nalgene bottle with one of those insulated sleeves(On Amazon). If you bought the bottle in the past couple of years it can handle boiling water(older style might melt).
There’s a bunch of different bottle insulators(aka parkas or jackets) on the market and they’re all basically the same. Look for the thickest foam you can find and make sure you buy one that fully insulates the lid(not just the sides).
The ones that clip to the outside of your pack on a carabiner are easier to use. You don’t want to have to stop and pull a bottle out of your pack every time you want a drink.
Be Careful With Hydration Bladders
Whether or not you can use a hydration bladder depends on the temperature and how well you insulate your hydration bladder/tube. It doesn’t matter how much insulation you use on the bladder/tube it will eventually freeze in extremely cold weather.
For short 1-2 hour hikes, I actually like to fill my water reservoir with coffee.
I know a lot of people that use hydration systems throughout the regular 3-Seasons and ditch them during the winter. Only a select few choose to continue using a hydration bladder once the weather turns. Don’t expect to use any old hydration system in freezing temperatures(it needs to be insulated).
Need Both Reservoir and Tube Insulation
Most hydration bladders aren’t designed to be used during the winter months. You might be able to get away with using non-insulated bladders on short 1-2 hour hikes, but after that you’ll need additional insulation.
I’ve been known to pair my Insulated Camelbak Unbottle(On Amazon) with an extra insulator sleeve(these are cheap). From there you can either add an insulated tube sleeve or buy one of these Camelbak Insulated tubes (On Amazon). Without additional insulation, your bladder and tube will freeze.
A bunch of different companies sell ski backpacks with integrated hydration systems, but most of these aren’t big enough for backpacking.
Keeping Your Hydration Bladder Warm
In moderate 20-30 degree weather, the body heat coming off your back should be enough to keep your reservoir from freezing. When it’s below 20 degrees you should consider adding one or two hand warmers and filling the bladder up with boiling water.
Just be careful when you go to take a sip. It’s hard to control the amount of water that comes out of a bite valve.
Purge The Bite Valve and Tube
Most backpackers purge their drinking hose and bite valve between taking a sip. Remember that even with insulated tubes your bite valve will be exposed to the elements. If you don’t purge the bite valve between sips it will freeze.
To purge the system simply blow into the drinking hose and bite valve. Blowing into the hose forces water back into the hydration reservoir so it doesn’t freeze. It takes a little bit of practice, but will eventually become automatic. Just don’t forget because then you’re screwed.
I always bring an extra water bottle just in case. You can also store keys, lighters, extra map, etc while it’s not in use.
Hard to Refill Hydration Bladder With Boiling Water
Refilling a hydration bladder with boiling water takes practice. The trick is trying to pour boiling hot water into the bladder without accidentally burning your hands and soaking your gloves… much easier with a Nalgene.
Most name-brand bladders can be used with boiling water straight from the pot. Just be careful when you pick it back up because it’s going to be hot. The thin plastic doesn’t insulate the bag at all. Just like playing hot potato!
Be Careful With Inline Filters
Inline filters may be a great addition to your hydration bladder in the summer, but they’re terrible for the winter. There’s just no way to stop the filter from freezing(can’t go in your pocket). You have to pretreat the water before it goes into your pack.


